
Required parts
Bumper components
| Description | Qty | P/N |
|---|---|---|
| Bumper front center | 1 | 51 11 1 868 091 |
| Bumper front left | 1 | 51 11 1 868 093 |
| Bumper front right | 1 | 51 11 1 868 094 |
| Covering left | 1 | 51 11 1 868 097 |
| Covering right | 1 | 51 11 1 868 098 |
| Bolt | 6 | 51 12 1 843 029 |
| hex nut with plate M8 | 6 | 51 11 1 835 625 |
| Front Rubber Protective Moulding | 1 | 51 11 1 882 988 |
| Clamp | X | 51 11 1 867 927 |
| Fillister Head Screw (ST4,8x16-Z1) | 1 | 07 11 9 907 925 |
| Body Nut (ST4, 8-7) | 1 | 07 12 9 925 738 |
| Rubber strip left | 1 | 51 11 1 868 101 |
| Rubber strip right | 1 | 51 11 1 868 102 |
License plate Molding
| Description | Qty | P/N | | |-------------|-----|-----| | | Plug in Nut | 2 | 51 18 1 852 299 | | Fillister Head Screw (ST4,8x16) | 2 | 51 18 1 821 830 | | Protective Cap White | 2 | 51 18 1 813 017 | | OR Protective Cap Black | 2 | 51 18 1 823 474 | | Flat Washer (4,3) | 2 | 07 11 9 936 412 | | Base (Italy market only) | 1 | 51 11 1 836 099 |
Bumper Mounting Kit
| Description | Qty | P/N |
|---|---|---|
| Mounting Parts Set (for bumpers only) | 1 | 51 11 9 056 461 |
Separate Bumper Mounting Components
| Description | Qty | P/N |
|---|---|---|
| hex nut with plate M8 | 6 | 51 11 1 835 625 |
| Hex Nut (M6-Z2) | 4 | 51 45 1 868 108 |
| Bumper Bracket | 2 | 51 11 1 868 105 |
| Hex Bolt (M10x25) | 2 | 07 11 9 913 834 |
| OR Hex Bolt (M10x25) | 2 | 07 11 9 914 114 |
| Flat Washer (10,5) | 2 | 07 11 9 936 436 |
| Wave Washer (B10) | 2 | 07 11 9 932 112 |
| Body Nut | 2 | 51 11 1 900 386 |
| Hex Head Screw (ST6,3x190-C0-Z2) | 2 | 07 11 9 916 967 |
Turn Indicator Lights
| Description | Qty | P/N |
|---|---|---|
| Left Turn Indicator (complete) | 1 | 63 13 1 373 297 |
| Right Turn Indicator (complete) | 1 | 63 13 1 373 298 |
| Bolt | 6 | 63 13 1 359 937 |
| Washer-Gasket | 6 | 63 13 1 361 965 |
| Bulb 12V 21W | 2 | 07 50 9 063 574 |
| Expanding Nut (ST 4.8) | 6 | 63 17 1 367 868 |
| Fillister Head Screw (ST4,8x16) | 6 | 07 11 9 907 789 |
| Turn Indicator Replacement Parts: | ||
| Replacement Indicator Gasket | 2 | 63 13 1 366 573 |
| Replacement Lens Right | 1 | 63 13 9 069 124 |
| Replacement Lens Left | 1 | 63 13 9 069 125 |
Fog Lights
| Description | Qty | P/N |
|---|---|---|
| Fog Lamp Left (Complete) | 1 | 63 17 1 375 057 |
| Fog Lamp Right (Complete) | 1 | 63 17 1 375 058 |
| Sheet Metal Screw | 4 | 63 17 1 367 315 |
| Bulb (12V 55W H1) | 2 | 07 50 9 064 001 |
| Fillister HEad Screw (ST4, 8x13-Z2) | 2 | 07 11 9 907 957 |
| Expanding Nut | 4 | 63 17 1 367 868 |
| Fog Light Replacement Parts: | ||
| Glass Holding Frame | 2 | 63 17 1 375 051 |
| Lens Only Left | 1 | 63 17 1 375 067 |
| Lens Only Right | 1 | 63 17 1 375 068 |
Valence Covering/Trim
| Description | Qty | P/N |
|---|---|---|
| Covering Left | 1 | 51 71 1 888 653 |
| Covering Right | 1 | 51 71 1 888 654 |
| Push-Button | 2 | 51 13 1 820 141 |
| Fillister Head Screw (ST4, 8x16-Z1) | 2 | 07 11 9 907 925 |
This conversion came about with the longing for Euro bumpers, yet not wanting to have to have a new valence put on the front of the car. This conversion can be done to any US E28 that has not had its valence seriously damaged or modified for any reason. And other than cutting up the valance is reverse-able back to USA form any time.
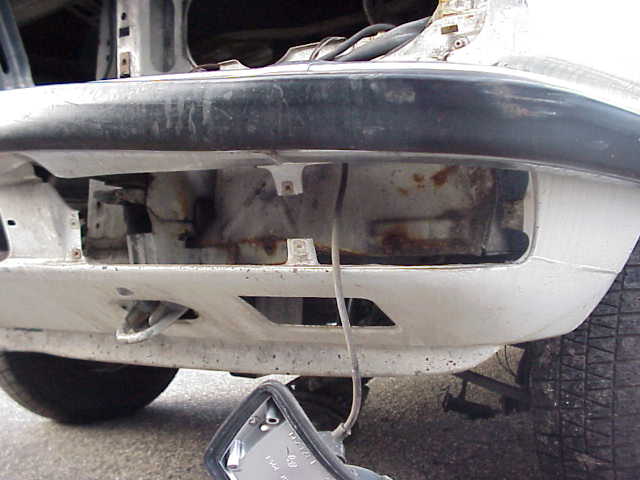
First the US bumper must be removed before any work can start. This is accomplised by first unplugging the turn signals that are inset into the bumper. Then using an 8mm socket, remove the six mounting bolts, three on each side, that hold the bumper shocks onto the frame rails. With these removed, carefully pull the bumper straight forward away from the car.
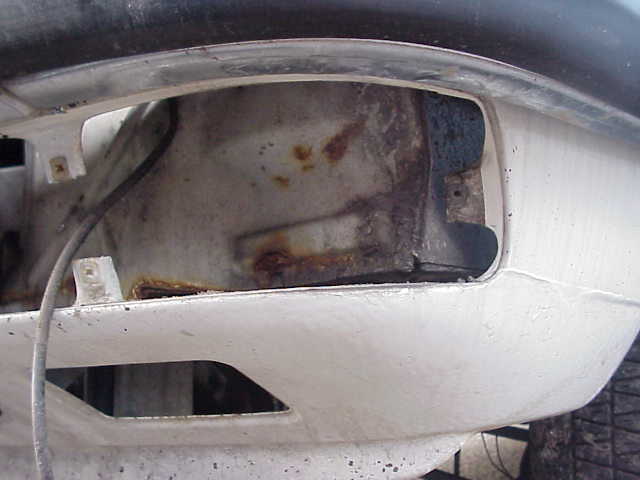
Now the bellows must be removed. First take out the side marker lights. You will see, once you remove the white plastic housing that holds the bulb, a body screw. This is the only reason you have to remove the side marker lights. Now remove the 8mm body screws that hold the bellows to the front upper apron. The front upper apron is the panel that holds the kidney grills and the light grills. Also don't forget to remove the screw that is located behind the side marker light and the screw that is located inside the fender, and screws into the bellows from inside the fender.
With the bellows now removed we can start modifying the valence for the turn signals and fog lights. The valance has the cut-outs were the lights mount already indented. So you can easily match up were the lights are supposed to fit in. Here is where you really need to be careful. If you cut too much off you can't stick it back on.
You now have to do some measuring. Take your turn signal and you will see a gasket around the outside of it. This gasket is suppost to fit snuggly into the valence. What needs to be done is you must measure to figure out were your mounting tabs need to be located. The reason why you must measure is because you don't want to just cut out the valence for the lights. You want to cut it out so that you leave mounting tabs for the lights. All you then have to do is drill a single hole and use a body clip to hold the light to the valence.
You'll have to match the mounting screws on the lights to the valance. Please remember to include all three mounting brackets/tabs for the turn signals. The fog lights mount differently.
Now I used a marker and marked what had to be cut and what needed to be saved. Then I used a 13mm drill bit and drilled four holes in the edges of the pieces that were not needed. This gave me access to be able to put the blade of the riciprocating saw into them and cut out the small panels. With the panels cut out, I bent the tabs that were left over back and away to test fit the lights. Where it wouldn't fit I would use a file or an angle grinder to get rid of the excess metal.
Once the light fit properly, I bent the mounting tabs in order to match the screw holes in the lights, and marked them for drilling. Do not mark them prior to cutting the valence because you will have to bend them into the car and then up (like in an "L" shape, please see accompanying photos). I made sure to make the center brackets as large as possible.
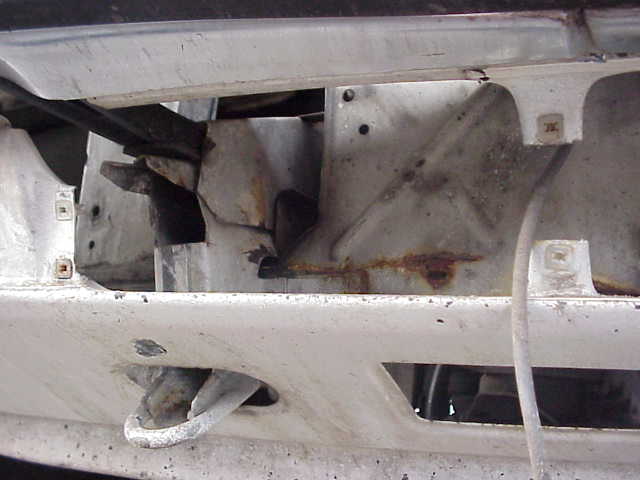
Now on to the all important fog light opening. Many people say you have to cut the whole frame rail back, but that is not true. All you need to do is use the riciprocating saw to cut horizontally through the frame rail at the same hieght as the top of the opening in the valence. Then you need to cut the frame rail vertically. You do this only enough so that you can fit the fog light in. What you're going to cut is actually the corner of the frame rail extension flange. You will cut out one of the mounting holes for the USA bumper shock, but you have the other 2 if you want to reinstall. Now here is a difficult part, if you think the rest is easy, you need to get a cutting wheel on the dremel, and you have to cut the frame rail far enough back so that the frame rail does not hit the back of the fog light. Once you have done this, this should remove the lower outside part of the frame rail as previously stated. This is all you have to remove. DO NOT REMOVE ANY MORE THAN NECASSARY!
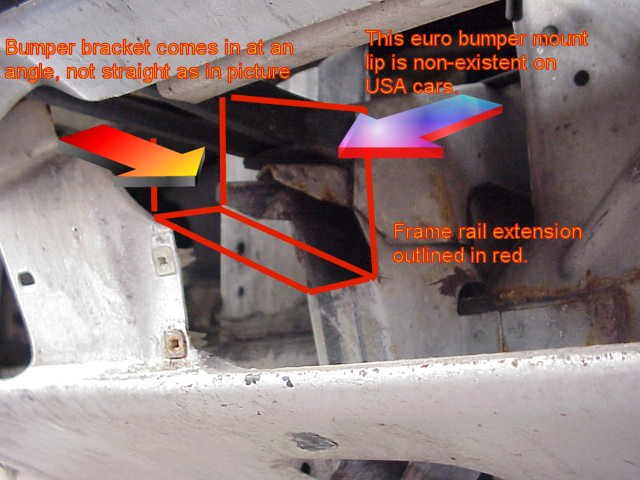
Now that the lights are able to fit in, you now what to completely assemble the bumper. Tighten everything up and try to insert it inside the frame rail extentions (where the bumper shocks used to mount to). You will find that you can't. The reason being is that you will need to cut the circle in the lower inside, to be a square corner. This is easily done with the riciprocating saw. This then allows for the bumper brackets to sit level. Insert the bumper in the frame rail and you will see that it sits far to low. The reason is that you have to bend the euro bumper mounting brackets. This is in order to mount them and for height. If you look into your frame rail extention, you will see that the bottom of the frame rail extension slopes down towards the back of the car. Your bumper mount needs to be more or less flush along this bottom side. The reason we're doing this, is because the euro bumper mounting lips on the frame rail were cut in order to fit the USA bumper shocks. Then there was a frame rail extension welded on the frame rail ends to which the bumper shock mounts.
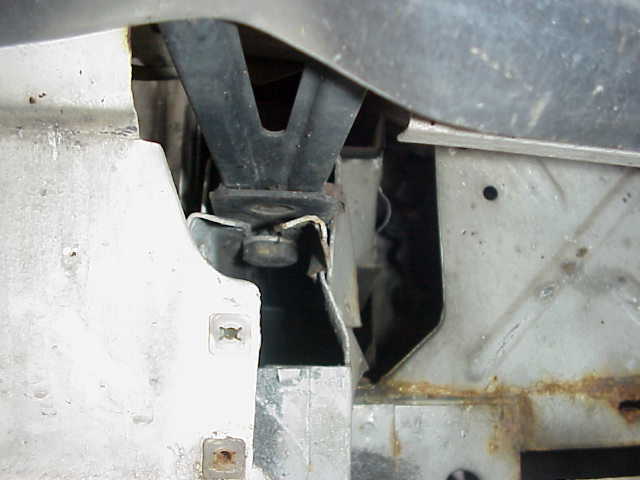
In the picture you see the small lip that the brackets lay on, and through which the bolt is put on. The USA cars will be different in that the euro brackets will be BENT and mount on the bottom part of the USA frame rail extension. In order to mount the bumpers Euro style, you will need to take off the USA frame rail extensions and weld BACK on the bumper mounting lip inside the frame rail, which is what the euro cars have.
Now you have to hard mount the bumper to the frame rail exension, so you have to bend the bracket so it sits flat against the bottom of the frame rail extension. Now that you have done that you should be able to bolt up the outside bolts that hold the bumper to the fender, using the holes in the fender that used to hold the belows on. If they do not line up, then you have not gotten the bumper situated correctly. Keep bending the mounting bracket until you can get the holes lined up. Now you have to mark the hole that must be drilled in the bottom of the frame rail extension. This hole is for the bolt that holds the bracket to the frame rail extension. You wonder how to drill this hole now. It is a pain. You need to get yourself a foot long drill bit. YES A FOOT LONG! Now this trick only works on the cars with the valences with the plastic towing eye covers. These are the later cars, but there is probably a way to do it on the early cars too. Open the plastic towing eye cover. Then you will need to jack up the front of the car. With the front of the car in the air, you can insert the drill bit. To get a good clean hole, I ran my drill bit up through the towing eye. This lined up correctly and I drilled the holes. With the holes drilled, test fit everything.
Now that you are test fitting everything, you will see that we haven't drilled the hole to mount the fog light adjuster bracket (the inside mounting bracket of the fog light). Do this now. You will only be able to drill the lower hole, but that is just fine, you do not need the upper screw to mount the bracket. Drill the lower hole and if everything bolts up, remove it all. This is the point at which I removed the little plastic plugs that hold the belows to the upper apron. These are a pain to get out. I suggest cutting them out. You cannot get to the backs of them so you have pull them out which is a pain.
Now that you have that stuff out, run the turn signal wires back into the valence. The reason why I did not say this before is that you could very easily cut the wires with the saw if they are inside the valence. Then prime the cut surfaces and any rust you spot. I use POR 15 paint as my primer. In the visable places, after it dries, I coat those with body color paint. Even though the body color paint may not match exactly, the texture of the valence covers that fact.
Everything is now painted and the paint is dry. This is when we wire up the turn signals and fog lights. First we do the turn signals. I had turn signals that had a dual filament bulb (like USA cars). This let me have the manditory marker light and turn signal all in one. You will also have to stick a reflector on the inside of the lens on the side so that you meet DOT regulations and pass inspection. Once you have done this, then you can wire the lights.
I cut off the connector that is used power the side marker light. This has 2 wires in it. One ground and one power. The power wire I run up to my Euro lights to run the city light. If you do not have the Euro lights, I would suggest leaving the connector on the wiring harness and taping over the end and tucking it in the valence. As for the 3 pin connect that powers the turn signal/marker light that is mounted in the bumper, cut off the connector on the US harness. At this point the brown ground wire goes to the brown ground wire. Then you will have to experiement with which wire powers the turn signal and which powers the marker light. You want it so that the marker light powers the low filament and the turn signal powers the high filament in the bulb. This will give you what you need.
Now that you have the indicator lights wired up, you can wire up the fogs. This is how I did it. You get the Euro 5 fog lights, they are different than any others, they come with wiring attached. Depend on the condition of your wiring, you might want to splice the new wiring into your car's harness, but the connector that is on the fog light is not found on the US wiring harness. So you will have to cut off the connector and hard wire it into the harness. What I did was remove the wiring that came with the fog light, took the rubber grommit off of that wiring. Then I removed the rubber grommit from the wiring on the car and pushed on the new grommit. I then installed the wiring from the car into the fog light. This saved on wiring and also makes for a cleaner install. With this wired up, I bolted in my lights, using body clips and sheet metal screws. The sheet metal screws screw into the body clips not the valence or any other body part.
With all of that bolted in, I bolted on the bumper for the last time and you are done. I looks really good, but for the work I would hope so. It should take you anywhere from two to five days to do depending on how confident you are with your bodyworking skills.
Written by Rob Anderson '01
Stolen from m535i.org